 |
 |
 |
COLORING SKIN
(Part 3 of 3)
Part 3: Colorizing the Skin
1. Load the skin selection again if necessary. Make sure the Airbrush layer is selected on the Layers palette. 2a. Bring up Photoshop's Colorize function by going to Image|Adjust|Hue/Saturation (or CTRL+U). Check the Colorize box. By changing the values in the Hue, Saturation and Lightness boxes (using the sliders or entering values), you can change the color of the selected area to a variety of values. The order of operations is not important. 2b. (PSP) Go to Colors|Colorize... on the menu (SHIFT+L on the keyboard) to bring up the Colorize function. Because PSP's colorize function only alters Hue and Saturation, PSP users will have to take additional steps to achieve the same color results. In addition to the Colorize function, you may also need to open Brightness/Contrast (menu: Colors|Adjust|Brightness/Contrast or keyboard: SHIFT+B) or Gamma Correction (menu: Colors|Adjust|Gamma Correction or keyboard: SHIFT-G; Link box should be checked). Unless otherwise noted, set unused option values to 0. NOTE: For PSP, the operations MUST be done in the order listed for best results.
Photoshop Paint Shop Pro Results Ice Maiden
- Hue: 25
- Saturation: 25
- Lightness: +43
- Hue: 22
- Saturation: 38
- Gamma Correction: 1.70
Vampire
- Hue: 20
- Saturation: 14
- Lightness: +30
- Hue: 20
- Saturation: 64
- Gamma Correction: 1.70
Fair
- Hue: 25
- Saturation: 53
- Lightness: +5
- Hue: 22
- Saturation: 139
- Gamma Correction: 1.50
Outdoor Tan
- Hue: 29
- Saturation: 55
- Lightness: -13
- Brightness: -15
- Hue: 23
- Saturation: 128
Dark
- Hue: 29
- Saturation: 35
- Lightness: -45
- Dodge Tool: *As necessary
- Brightness: -50
- Hue: 21
- Saturation: 100
- Gamma Correction: 0.45
- Dodge Tool: *As necessary
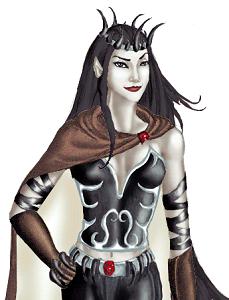
Drow Elf
- Hue: 221
- Saturation: 15
- Lightness: -35
- Dodge Tool: *As necessary
- Brightness: -75
- Hue: 161
- Saturation: 25
- Dodge Tool: *As necessary
* Colorizing darker skin tones tends to flatten the image. Going back over the colorized areas with the Dodge tool will bring out the highlights again.
Use the settings in the table above as guidelines for your own work, but don't be afraid to experiment and make your own adjustments. Each figure you draw will be different, but as long as you have a good grayscale foundation, you can achieve any flesh tone you need.
Gallery | Commissions | Store | Artist | Links | Tutorials | Download
Home - FAQ - Blog - ContactAll images on these pages are © Copyright 1994-2006 Maggie Wang. All rights reserved. Copyright and Usage Info


