|
 |
 |
COLORING SKIN
(Page 1 of 3)
One of the most useful tricks to master in computer coloring is the ability to create realistic flesh tones quickly and relatively realistically. Nothing ruins the effect of a good fantasy portrait drawing more than a shoddy coloring job on the hero or heroine. How many times have you seen a wonderfully detailed pencil or ink drawing in an Elfwood gallery completely flattened (literally and figuratively) by inept, hasty computer coloring with the Fill and Airbrush tools?
Never fear, though! Make it through this comprehensive tutorial and you'll be able to kiss those skin-coloring blues good bye. Pay attention now, because Professor Maggie is going to share her secret techniques for coloring the fleshy bits of everything from pale snow maidens to dreary drow!
Some General Notes
Contents
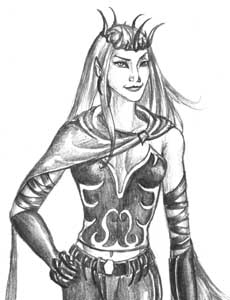
- The techniques in this tutorial work best with finished, shaded pencil drawings. This means that all shadows, details, and modelling are already in place.
- The same techniques can be used to color other features as well--from hair to clothing. The key is to have a solid grayscale drawing (or digital image) first! I really can't stress this enough. If your shading skills with pencil or computer aren't up to par, this coloring method won't work for you. A badly drawn figure colored this way won't look like a glossy masterpiece; it will look like a badly drawn figure with a glossy coloring job.
- This tutorial uses Photoshop 5.5, but the features required to complete the tutorial are also available in version 4.0.
- Although the palettes and menus shown are from Photoshop, Paint Shop Pro 6.0 and above may also be used. Where appropriate, alternate instructions for Paint Shop Pro (PSP) are shown in blue.
Part 1: Selecting the Flesh Areas
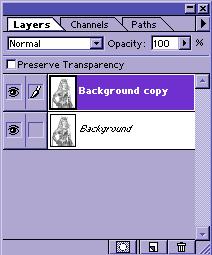
1. Before you do anything else, make sure that you have your Layers palette open in Photoshop. If you don't see it in your work area, go to Window|Show Layers to open the palette. PSP: View|Toolbars|Check Layer Palette option, or click .
2. Open your black and white image file. If you originally scanned the image in Grayscale mode, you may have to go to Image|Mode|RGB Color to switch the image to a useable format. PSP: Colors|Increase Color Depth|16 Million Colors or SHIFT+CTRL+0 (zero, not letter "O") 3. Now make a duplicate layer of your image by either selecting Layer|Duplicate Layer from the menu or dragging your background layer down to the New Layer button in your Layer palette. Name this layer Blur. (Tip: In both Photoshop and PSP, you can change the properties of each layer by double-clicking the layer.) 4. Click on the new Blur layer in the Layer palette to start working on that layer. Always keep a copy of the original drawing on one of the layers in case the coloring doesn't go as planned and you need to start over. It is also a convenient to compare your in-progress work with the original to make sure that you haven't altered the look of the image too much. 5. Select the Lasso tool from your Tool palette. Using the Lasso tool, select all the skin areas in your figure. To select non-adjacent skin areas, hold down the SHIFT key while selecting. To subtract from existing selection areas, hold down the ALT key while using the tool. (Tip: It is often easier to select the entire face, and then go back and subtract features such as the eyes and lips using the Alt modifier.) PSP: Selection type-Freehand, Antialias-Checked. Hold down the CTRL key to subtract instead of ALT.
6. Save your selection to an alpha channel by going to the Select|Save Selection... menu. In the dialog box, use the following settings:
PSP: Selections|Save to Alpha Channel|New Channel
- Channel: New
- Name: Skin
- Operation: New Channel
Gallery | Commissions | Store | Artist | Links | Tutorials | Download
Home - FAQ - Blog - ContactAll images on these pages are © Copyright 1994-2006 Maggie Wang. All rights reserved. Copyright and Usage Info