|
 |
 |
COLORING SKIN
(Page 2 of 3)Part 2: Preparing the Grayscale Model
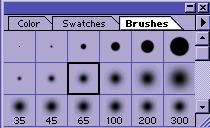
1. With the skin areas still selected, use the Blur tool (use a smaller size soft brush, pressure set to 90-100%) to soften the penciled lines of shading in your drawing. PSP: Use the Retouch tool
, Retouch Mode=Soften, Paper Texture=None, Opacity 90-100%, Step=1, Hardness=0, Density=100).
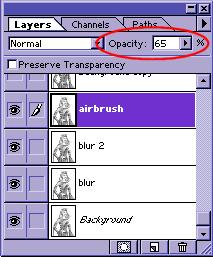
2. Be careful around areas like the jawline, ears and nose, which need to retain their sharpness. Use a smaller brush and less pressure (around 30% or less) near these features to avoid blurring them beyond recognition. 3. Duplicate the Blur layer twice. Name the first copy Blur 2 and the second Airbrush. The next few operations will take place on the Airbrush layer. Reduce the opacity of the Airbrush layer to 65%. 4. Make sure the skin area is still selected. If it isn't, go to Select|Load Selection and re-load the "skin" channel. With the skin selected, hit the Delete key on your keyboard. Switch to the Fill tool
and select a light gray color from your Swatch palette. Fill in all selected areas with the light gray. PSP: Reload the selection with Selections|Load from Alpha Channel if necessary. Click on the Background color selection on your Active Colors Panel (the block behind the Foreground color selection)
. A swatch dialog box will appear. Choose the lightest grey color from the swatches, then adjust it to an even paler gray. Click OK. Now, with the skin area selected and your pale grey as the secondary color selection, hit DELETE on your keyboard. The selected area should be pale grey.
5. Select the Airbrush tool
and set the pressure to 70%. Choose a medium grey color from the Swatch palette. Carefully use the airbrush to shade in the skin areas, using the shading from the layer below (visible since the current layer is set to 65% transparency) as a guide. Zoom in and change brush sizes as necessary to work on detailed areas. PSP: Set the Airbrush tool
to Shape: Round, Hardness: 0 and Opacity: 40. Brush Size will vary. All other settings: 100
6. Select a dark grey, nearly black color from the palette. Use this color with the Airbrush tool on the darkest areas of the skin. Don't worry if there are obvious lines of color gradation visible.
7. Switch back to the Blur tool 8. (Optional) For an even more realistic look, use the Burn (darken) and Dodge (lighten)
tools to darken the shadows (below the jaw, shadowed side of face and body) or create bright highlights (cheekbones, chin, etc). Soften the image again with the Blur tool
PSP: The Retouch tool
Mode Hardness Opacity Step Density Burn 0 40 1 100 Dodge 0 20 1 20-40 Soften 0 90-100 1 100 9. With the Airbrush layer still selected, click the link box on the Blur 2 layer to link the two layers together. Click Layer|Merge Linked on the menu, or hold down (Ctrl+E) to merge the two layers. You should now have one single layer still named Airbrush. PSP: Hide all layers except Airbrush and Blur 2. Right click on the Airbrush layer to bring up the Layer options menu. Merge|Merge Visible to combine the two layers. The resulting layer will be named Merged. Rename the layer to Airbrush. << Previous Page
Gallery | Commissions | Store | Artist | Links | Tutorials | Download
Home - FAQ - Blog - ContactAll images on these pages are © Copyright 1994-2006 Maggie Wang. All rights reserved. Copyright and Usage Info